More fun with DNS packet captures

Following my last post on DNS query port usage, here are some more interesting DNS graphs.

The following graphs are based on a packet capture taken from the network interface of a recursive DNS server. This DNS server is one of the primary recursive DNS servers for a small Internet service provider. The capture includes all UDP DNS traffic to the DNS server as well as UDP DNS traffic from the DNS server to addresses within the local AS.

/usr/sbin/capinfos local.pcap
File name: local.pcap
File type: Wireshark/tcpdump/... - libpcap
File encapsulation: Ethernet
Number of packets: 200000
File size: 30702100 bytes
Data size: 27502076 bytes
Capture duration: 2659.328827 seconds
Start time: Sat Jul 26 01:45:31 2008
End time: Sat Jul 26 02:29:50 2008
Data rate: 10341.74 bytes/s
Data rate: 82733.89 bits/s
Average packet size: 137.51 bytes
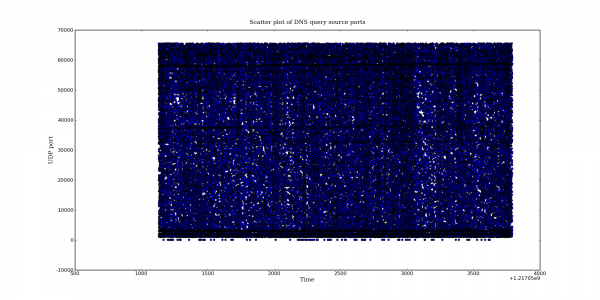
Scatter plot of DNS query source ports

Scatter plot of DNS query source ports

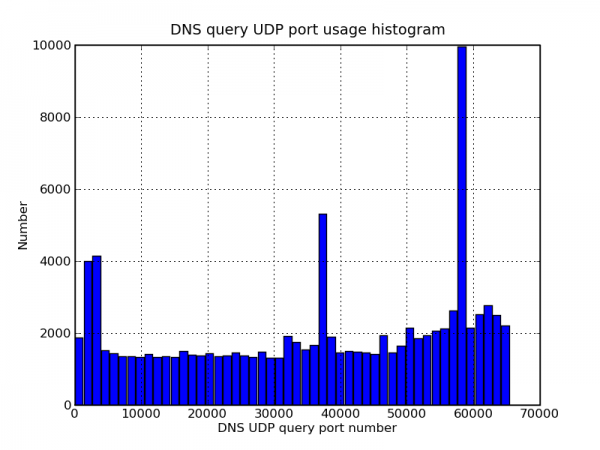
DNS query UDP port usage histogram

DNS query UDP port usage histogram

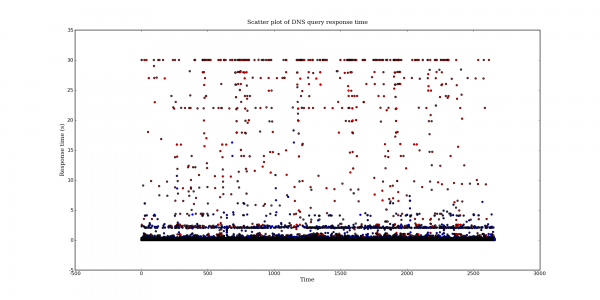
Scatter plot of DNS query response time

Scatter plot of DNS query response time

Scatter plot of failed DNS query response time

Scatter plot of failed DNS query response time

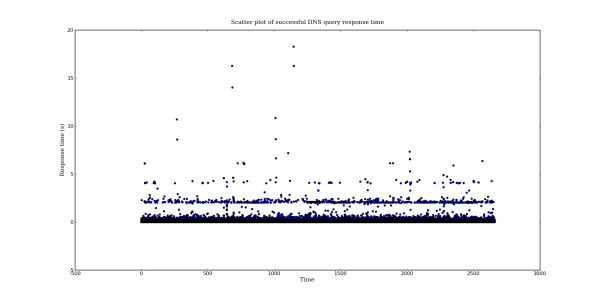
Scatter plot of successful DNS query response time

Scatter plot of successful DNS query response time

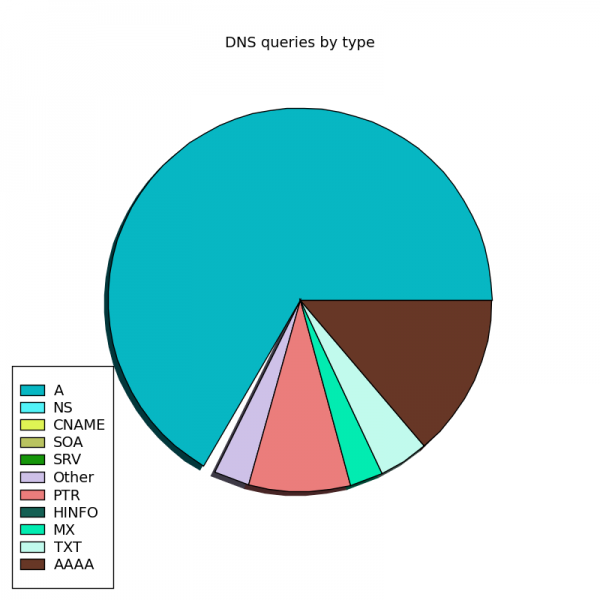
DNS queries by type

DNS queries by type

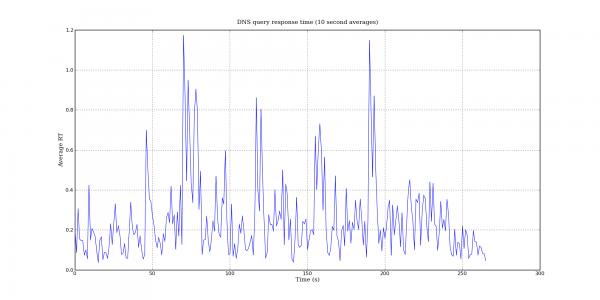
DNS query response time

DNS query response time

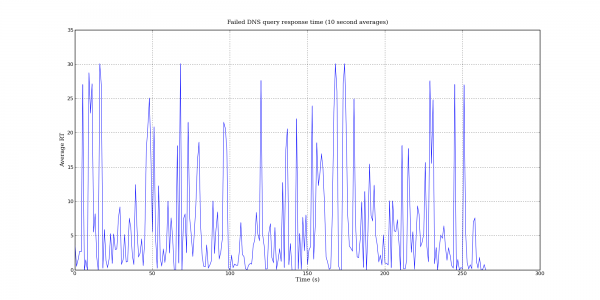
Failed DNS query response time

Failed DNS query response time

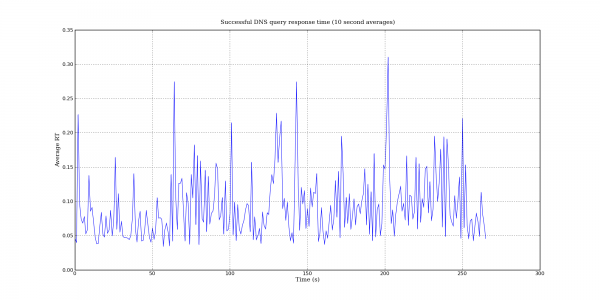
Successful DNS query response time

Successful DNS query response time

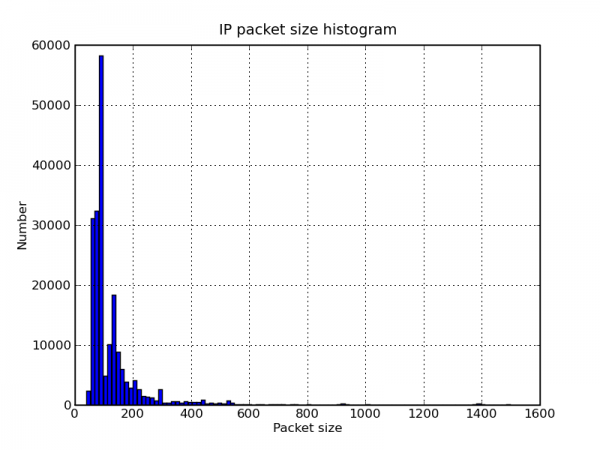
IP packet size histogram

IP packet size histogram

DNS query UDP source port graphs

Recently Dan Kaminsky announced a new DNS vulnerability. This isn’t a vulnerability in a particular DNS implementation but a problem with the DNS protocol itself. You can find information from CERT here. The exact details of the vulnerability were kept quiet even after DNS software vendors simultaneouslly released patches to mitigate the problem. One of the main changes made by these patches was to increase the number of source ports used for outgoing queries to other DNS servers. From this information it was wildly speculated that the vulnerability is related to cache poisoning.

Perhaps partly due to an accidental, early release of information the full vulnerability details are now available.

I happened to have some DNS captures available from before and after the patch was applied so I thought it might be interesting to graph the UDP query port usage behaviour for before and after the patch. The graphs presented below come from a RHEL 5.2 based DNS server. The post-patch DNS server version is bind-9.3.4-6.0.2.P1.el5_2. I don’t have the pre-patch version number handy but presumably it is the previous Bind package released by RedHat. Both of the captures came from the same DNS server but note that the capture length is different.

The difference is quite dramatic. Bind appears to be making good use of almost the entire port space.

DNS server source UDP query port usage before patch

DNS server source UDP query port usage before patch

DNS server UDP query port usage after patch

DNS server source UDP query port usage after patch

Also note the interesting banding in the second graph. This behavior is not limited to the new patch. I have noticed this in other pre-patch captures as well. More on that later.

Search Engine on CBC

This probably isn’t news to many people by now but CBC’s Search Engine will not be returning in the fall. What a loss. To me Search Engine is a great example of what a radio show and Podcast can be. The show had strong audience participation and felt almost more like a blog post than a traditional radio show. More importantly, Search Engine covered digital issues such as Copyright reform in a way that is greatly needed at this time.

I really hope that CBC will reconsider this cancellation. Public broadcasters need to bring in young people and new listeners. A new and experimental format like Search Engine is a great way to accomplish this. The huge amount of interest in this spring’s Copyright reform bill shows that many Canadians are becoming aware of the topics Search Engine covered. Now is not the time to give up on this show.

Fortunately it looks like Search Engine’s sister show, Spark, is still going to continue.

IPv6

For the first time in almost month I had a bit of free time for experimentation today so I decided it was time I set up my home network to use IPv6. I’ve tried to keep up on the development and deployment of IPv6 but besides setting up a few internal network nodes with IPv6 addresses I haven’t played with it much in the past.

Background

Before I get into configuration here are a few links to some of the better articles and videos that I discovered today. Some of these are pretty technical.

The End of the (IPv4) World

Current projections on the time frame for IPv4 address exhaustion.

What this prediction is saying is that some time between late 2009 and late 2011, and most likely in mid-2010, when you ask your local RIR for another allocation of IPv4 addresses your request is going to be denied.

IPv6 Transition Tools and Tui

This article describes 6to4 and Teredo which are two technologies that aim to ease the transition from IPv4 to IPv6.

IPv6 Deployment: Just where are we?

Current IPv6 usage estimations.

Google IPv6 Conference 2008

Videos from Google’s IPv6 conference in May 2008.

IPv6 content

Other than gaining some experience with IPv6 there really isn’t a lot of benefit to using IPv6 yet. However, if you are in any way involved with IP networking it may be time to start learning about IPv6. Current projections have the IPv4 address space being exhausted in mid-2010 (The End of the (IPv4) World).

At the moment there are very few sites available which are accessible via IPv6 and even fewer are IPv6 only. Google has setup an IPv6 version of their main search site at ipv6.google.com. It is unfortunate that Google does not have an IPv6 (AAAA) record for www.google.com yet but given that providing an AAAA record to some hosts without IPv6 connectivity can cause problems, their choice is not surprising. Hopefully these kinks can be worked out as more people gain experience with IPv6. Rather then trying to remember to type ipv6.google.com all of the time I have locally aliased www.google.com to ipv6.google.com. Everything seems to be working normally so far.

SixXS maintains a list of IPv6 content at Cool IPv6 Stuff. A couple of highlights from this list are the official Beijing 2008 Olympic website and some IPv6 only BitTorrent trackers.

It has been said that the availability of porn is what really drove the adoption of the Internet. In this spirit The Great IPv6 Experiment is collecting copyright licenses to a large amount of commercial pornography and regular television shows for distribution only via IPv6. The project is due to launch sometime “soon”. What a great idea for an experiment.

A short tutorial for IPv6 and 6to4 on Fedora 9

Getting things setup turned out to be pretty easy on Fedora. I expect the same is true of any Linux distribution although the details will differ. Since most ISPs do not have native IPv6 support, special technologies are required to connect to other IPv6 nodes over IPv4. I chose 6to4 to connect to the IPv6 network. 6to4 requires a public IP address so if you are behind NAT look into using Teredo instead. Incidentally, Teredo is supported by Windows Vista.

The first step is to enable IPv6 and 6to4 on the publicly facing network interface. The required configuration file can be found in /etc/sysconfig/network-scripts/ifcfg-XXX where XXX is the name of your publicly facing network interface. Some or all of this may be configurable through system-config-network and other GUI tools but I tend to stick to configuration files. I added the following lines:

IPV6INIT=yes
IPV6TO4INIT=yes
IPV6_CONTROL_RADVD=yes

A few new entries were also required in the global network configuration (/etc/sysconfig/network).

NETWORKING_IPV6=yes
IPV6FORWARDING=yes
IPV6_ROUTER=yes
IPV6_DEFAULTDEV="tun6to4"

Note that if the computer you are configuring is not going to act as a IPv6 gateway for other hosts on your network you probably don’t want to add IPV6FORWARDING and IPV6_ROUTER. After editing these files restart the network service.

/sbin/service network restart

You should now have a new network interface named tun6to4 with an IPv6 address starting with 2002 assigned to it. 2002 (hexadecimal notation) is the first sixteen bits of the IPv6 address space dedicated to 6to4.

/sbin/ifconfig tun6to4

Now try pinging an IPv6 addresses.

ping6 ipv6.google.com

If you can reach ipv6.google.com you have working IPv6 connectivity. If you are not configuring an IPv6 gateway you can ignore everything below this point.

In order for the configured host to act as a gateway for IPv6 traffic it needs to advertise the IPv6 network prefix to the rest of your network. IPv6 doesn’t require DHCP for automatic address configuration but does require prefix announcement so the local node can figure out its IPv6 address. Prefix advertisements are handled by the radvd daemon. Below is the configuration I used (/etc/radvd.conf). Note the leading zeros in the prefix. This indicates that radvd should create the IPv6 prefix using the special 6to4 format.

interface eth0
{
        AdvSendAdvert on;
        MinRtrAdvInterval 30;
        MaxRtrAdvInterval 100;

        prefix 0:0:0:0001::/64
        {
                AdvOnLink on;
                AdvAutonomous on;
                AdvRouterAddr off;
                Base6to4Interface ppp0;
                AdvPreferredLifetime 120;
                AdvValidLifetime 300;
        };
};

After restarting radvd the other IPv6 capable nodes on your local network should also be automatically assigned an IPv6 address starting with 2002.

/sbin/service radvd start

I’m not sure if this is the way it is supposed to work or not, but eth0 on my gateway never obtains a 2002 IPv6 address automatically (this is box radvd is running on). As a result, I assigned the IPv6 address manually. Since my external IPv4 address never changes this isn’t a problem for me but it seems wrong to have to manually change the interface address if the external IPv4 address changes even though radvd will correctly advertise the new IPv6 prefix to the rest of the network automatically.

If you already know how IPv6 addresses are constructed skip this paragraph. In what will likely be the most common deployment model, IPv6 addresses are constructed of two parts: a 64-bit network identifier (prefix) and a 64-bit host identifier. The network identifier is assigned by the ISP. In the case of 6to4 the network prefix is constructed by using your public IPv4 address in combination with the first sixteen bits of the address being set to 2002. The host or node identifier is constructed by extending the 48-bit MAC address to 64-bits.

Determining the IPv6 address to assign to the internal interface (eth0) is a little tricky. First get the network prefix portion of the IPv6 address assigned to the tun6to4 interface. You want everything before the /16. This is the first 64-bits of your IPv6 address. Then look at the link-local IPv6 address which is automatically created on eth0. This address will start with fe80. The last 64-bits of this address is also the last 64-bits of the new address because this is the MAC address of the network interface. Copy everything after “fe80::”. Append this to the previously obtained network prefix separating the values with a colon. You now have the IPv6 address. Append an “IPV6ADDR=” line to /etc/sysconfig/network-scripts/ifcfg-eth0 and restart the network service (or the interface only if you like). You should now be able to ping6 between network nodes using the 2002 prefixed IPv6 addresses.

Once you have established connectivity between the nodes try ping6ing ipv6.google.com from the internal network nodes. If the ping fails you will likely have to investigate the iptables and ip6tables rules on both the gateway and the internal nodes.

Gin and the cognitive surplus

Gin, Television, and Social Surplus

People new to open source software, blogging and other participatory Internet activities often wonder where others find the time. In short, it comes from not wasting a lot of time on things such as TV. The two-way nature of the Internet has made it possible for normal people to be part of the creative process in their spare time in a way that one-way media like TV and radio do not.

The article linked to above refers to the time wasted on TV etc as the cognitive surplus. It even goes on to define a ‘cognitive unit’ based on the total amount of work that has gone into creating Wikipedia. Using this unit, the amount of cognitive resources that are wasted on TV every year is estimated at 2,000 Wikipedias or 200 billion hours in the U.S. alone.

The linked article is worth your time. The suggested link between Gin, TV and societal change is fascinating.

Environment Canada/Google maps mashup

Environment Canada is nice enough to publish radar data for their many weather radars across the country. The Exeter WSO radar covers the area in which I live.

A friend of mine has created a great Google maps mashup which makes use of the data provided by Environment Canada in combination with the KML file format which has recently been standarized. Note that because of the multiple overlay layers you may need to turn off some of the data (checkboxes on the right) to make Google maps faster.

Environment Canada Weather Radar on Google Maps

Environment Canada Weather Radar KMZ (Google Earth)

Kier has also made a couple of blog posts describing the development of the mashup [1, 2].

Amazon EC2 from a network administration perspective

There has been lots of discussion and buzz around the Amazon Web Services (AWS) lately. I posted a few links about this last week. Most of the articles that I have read on AWS speak of it from a high level. General discussions about how the service allows your web application to increase capacity as required are interesting but I was curious about the interface that these services present application developers and to the Internet. More specifically, how do the AWS interfaces compare with normal server colocation services.

Amazon AWS is actually a collection of services. The Elastic Compute Cloud (EC2) is the service most commonly discussed. Other interesting services that are part of AWS include the Simple Storage Service (S3), SimpleDB and the Simple Queue Service (SQS). This article will only discuss EC2 but does not aim to be a EC2 tutorial. Amazon provides a good user guide if you are sufficiently interested.

Everything below comes from an afternoon of experimentation with EC2. Please leave a comment with any corrections or other useful bits of information you might have.

Signing up

EC2 operates on a pay for what you use model. As a result you need a credit card to use EC2 so Amazon can bill you once per month based on your usage. The first step is to sign-up for an AWS account. This account will give you access to AWS documentation and other content. After you have an AWS account you can then enroll in EC2. It is at this point that the credit card is required.

All interaction with EC2 occurs over web service APIs. Both REST and SOAP style interfaces are supported. Web service authentication occurs via X.509 certificates or secret values depending on the web service API used. Amazon nicely offers to generate an X.509 certificate and public/private keys for you. Letting Amazon create the keys and the certificate is probably a good idea for most people since it is not an entirely trivial task. However, depending on how paranoid you are you might want to create the keys locally. Amazon says they don’t store the private keys they generate and I have no reason to doubt them but generating the keys locally reduces the possibility that your private key will be compromised.

It’s all about virtual machines

The fundamental unit in EC2 is a virtual machine. If you have experience with Xen or VMWare you can think of EC2 as a giant computer capable of hosting thousands of virtual machines. In fact, the virtualization technology used by EC2 is Xen. At present only Linux based operating systems are supported but Amazon says that they are working towards supporting additional OS’s in the future. Since Xen already has the capability to host Windows and other operating systems this certainly should be possible.

All virtual machine images in EC2 are stored in Amazon’s S3 data storage service. Think of S3 as a file system in this context. Each virtual machine image stored in S3 is assigned an Amazon Machine Image (AMI) identifier. It is this identifier that serves as the name of the virtual machine image within EC2.

Virtual machine images within EC2 can be instantiated to become a running instance. Many instances of an image can be running at any one time. Each instance has its own disks, memory, network connection etc so it is completely independent from the other instances booted from the same image. Think of the virtual machine image as an operating system installation disk. This is all very similar to VMWare and other virtualization technologies.

Amazon and the AWS community provide a large number of AMIs for various Linux distributions. Some are general images while others are configured to immediately run a Ruby on Rails application or fill some other specialized role. Of course it is also possible to create new AMIs either for public or private use. Private images are encrypted such that only EC2 has access to them. Since private images will likely contain proprietary code this is a necessary feature.

For an example of why you might want multiple images consider a three tier web application which consists of a web server tier, application tier and a database tier. By having an AMI for each of these machine types the application author can quickly bring new virtual machines in any tier online without having to make configuration changes after the new instance has booted. EC2 also allows a small amount of data to be passed to new instances. This data can be used like command line arguments. For example the address of a database server could be passed to the new instance.

Interacting with EC2

All interaction with EC2 occurs via very extensive web service APIs. Creating and destroying new instances is trivial as is obtaining information on the running instances. There is even a system in place for instances to obtain information about themselves such as their public IP address. Where applicable, such as when starting a new virtual machine instance, these web service calls must be authenticated via a X.509 certificate or a secret value.

Since not everyone will want to write their own EC2 management software Amazon provides a set of command line utilities (written in Java) which wrap the web service APIs. This allows the user to start, stop and manage EC2 instances from the command line.

Creating a new instance is as simple as:

./ec2-run-instances ami-f937d290 -k amazon

The ‘-k amazon’ specifies the name of the SSH private key to use. I’ll come back to this in a bit. Starting ten instances of this image can be accomplished by adding ‘-n 10’

./ec2-run-instances ami-f937d290 -n 10 -k amazon

It is also possible to look at the virtual machines console output. Unfortunately, this is read-only. Management activities are not possible via the console. In this case the instance identifier is passed not the AMI.

./ec2-get-console-output i-8fad57e6

Again, all of the management activities happen via web service APIs so you can build whatever management software you require.

What do the VMs look like?

Hardware platforms

At present Amazon offers three different virtual hardware platforms.

  1. Small instance:  1.7 GB of memory, 1 EC2 Compute Unit (1 virtual core with 1 EC2 Compute Unit), 160 GB of instance storage, 32-bit platform.
  2. Large instance: 7.5 GB of memory, 4 EC2 Compute Units (2 virtual cores with 2 EC2 Compute Units each), 850 GB of instance storage, 64-bit platform.
  3. Extra large instance: 15 GB of memory, 8 EC2 Compute Units (4 virtual cores with 2 EC2 Compute Units each), 1690 GB of instance storage, 64-bit platform.

Data storage

The storage layout of a small instance running a Fedora 8 image looks like the following:

-bash-3.2# cat /proc/partitions
major minor  #blocks  name

   8     2  156352512 sda2
   8     3     917504 sda3
   8     1    1639424 sda1
-bash-3.2# df -h
Filesystem            Size  Used Avail Use% Mounted on
/dev/sda1             1.6G  1.4G  140M  91% /
none                  851M     0  851M   0% /dev/shm
/dev/sda2             147G  188M  140G   1% /mnt

Output from top:

Tasks:  49 total,   1 running,  48 sleeping,   0 stopped,   0 zombie
Cpu(s):  0.6%us,  1.0%sy,  0.0%ni, 96.1%id,  0.6%wa,  0.0%hi,  0.0%si,  1.7%st
Mem:   1740944k total,    88904k used,  1652040k free,     4520k buffers
Swap:   917496k total,        0k used,   917496k free,    33424k cached

Data persistence

The disk partitions attached to each instance are allocated when the reservation is created. While these file systems will survive a reboot they will not survive shutting the instance down. Also note that Amazon makes it clear that internal maintenance may shut down virtual machines. This basically means that you cannot consider the disks attached to the reservations as anything more then temporary storage. It is expected that applications running on the EC2 platform will make use of the S3 data storage service for data persistence. In fact, signing up for the EC2 service automatically gives access to S3.

Network configuration

Once instantiated each virtual machine has a single Ethernet interface and is assigned two IP addresses. The IP address assigned to the Ethernet interface is a RFC-1918 (private) address. This address can be used for communication between EC2 instances. The second address is a globally unique IP address. This address is not actually assigned to an interface on the virtual machine. Instead NAT is used to map the external address to the internal address. This allows the instance to be directly addressed from anywhere on the Internet but does limit communication to using the protocols supported by Amazon’s NAT system. At present traffic to and from the virtual machines is limited to the common transport layer protocols (TCP and UDP) making it impossible to use other transport protocols such as SCTP or DCCP.

Both the internal and external IP addresses are assigned to new instances at boot time. EC2 does not support static IP address assignment.

Authentication and Security

Firewall

Amazon implements firewall functionality in the NAT system which handles all public Internet traffic going to and from the EC2 instances. When instantiated each instance can be assigned a group name or use the default group. The group name functions like an access list. Changing the access rules associated with a group is accomplished with the ec2-authorize command. The following example allows SSH, HTTP and HTTPS to a group named ‘webserver’.

ec2-authorize webserver -P tcp -p 22
ec2-authorize webserver -P tcp -p 80
ec2-authorize webserver -P tcp -p 443

Instance authentication

The authentication method used to connect to an EC2 instance depends on whether or not you build your own images. If you build your own image you can use whatever authentication or management solution you like. Obvious examples include configuring the image with predefined usernames and passwords and using SSH or perhaps Webadmin. Installing SSH keys for each user and disabling password authentication is probably the best choice.

Authentication when using the publicly available images is a little more complicated. Having a default user/password combination or even default user SSH keys would allow other users to easily login to an instance booted from a publicly available image. To get around this problem Amazon has created a system whereby you can register an SSH key with EC2. During the virtual machine imaging process the public portion of this SSH key is installed as the user key for the root user.

How is this different from normal server co-location?

The biggest difference between server colocation and EC2 is the ephemeral nature of the resources in EC2. This is a positive property in that it is trivial to obtain new resources in EC2. On the negative side of things the fact that ‘machines’ can disappear and that other resources such as IP address assignments are unpredictable adds new complexities.

Machine failure

Amazon states that servers can be shut down during maintenance periods and of course hardware failures will happen. Both of these events will result in virtual machine instances ‘failing’. Since disks and therefore the data that they contain disappear when instances die it seems that the complete failure of individual virtual servers is going to be a more common event than one might expect with traditional server co-location. Consider that a massive power failure event in Amazon’s data center(s) will be the equivalent to a traditional colocation facility being destroyed. Not only do you temporarily lose operational capability but each and every server and the data they were processing and storing would be gone.

In reality every large scale web service should plan for large failure events and individual server failure is also expected to happen regularly given enough nodes. Perhaps deployment on EC2 will make these events just enough more likely to force developers to address them rather than implicitly assuming that they will never occur.

If anyone reading this has experience using EC2 I would love to hear about how often you experience virtual machine failure.

HTTP load balancing

Another interesting complication comes from the fact that EC2 does not support static IP address assignments. Often large web deployments include a device operating as a load balancer in front of many web servers. This may be a specialized device or another server running something like mod_proxy. Using example.com as an example, a typical deployment would point the DNS A records for www.example.com to the load balancer devices. When colocating a server it is normal to be assigned a block of IP addresses for your devices. This makes it easy to replace a failed load balancer node without requiring DNS changes. However, in the case of EC2 you do not know the IP address of your load balancer node until it has booted. As already discussed, this node can disappear and when its replacement comes back online it will be assigned a different IP address.

This presents a problem because the Internet’s DNS infrastructure relies on the ability of DNS servers to cache information. The length of time that a particular DNS record is cached is called the time to live (TTL). Within the TTL time a DNS server will simply return the last values it obtained for www.example.com rather than traversing the DNS hierarchy to obtain a new answer. The dynamic nature of IP address assignment inside EC2 does not mix well with long TTL values. Imagine a TTL value of one day for www.example.com and the failure of the load balancer node. The result would be up to a full day where portions of the Internet would be unable to reach www.example.com. Perhaps more inconvenient would be the user seeing another EC2 customer’s site if the address was reassigned.

In order to work around this problem one solution is to use a very low TTL value. This is the approach taken by AideRSS.

$ dig www.aiderss.com

; < <>> DiG 9.5.0b1 < <>> www.aiderss.com
;; global options:  printcmd
;; Got answer:
;; ->>HEADER< <- opcode: QUERY, status: NOERROR, id: 3721
;; flags: qr rd ra; QUERY: 1, ANSWER: 2, AUTHORITY: 5, ADDITIONAL: 5

;; QUESTION SECTION:
;www.aiderss.com.               IN      A

;; ANSWER SECTION:
www.aiderss.com.        3600    IN      CNAME   aiderss.com.
aiderss.com.            60      IN      A       72.44.48.168
. . .
$ host 72.44.48.168
168.48.44.72.in-addr.arpa domain name pointer ec2-72-44-48-168.compute-1.amazonaws.com.

AideRSS is using a sixty second TTL for the aiderss.com A record. This means that every sixty seconds all DNS servers must expire the cached value and go looking for a new value.

Another site hosted on EC2 is Mogulus (just found them when looking for EC2 customers). They take a slightly nicer approach to this problem.

$ dig www.mogulus.com

; < <>> DiG 9.5.0b1 < <>> www.mogulus.com
;; global options:  printcmd
;; Got answer:
;; ->>HEADER< <- opcode: QUERY, status: NOERROR, id: 46281
;; flags: qr rd ra; QUERY: 1, ANSWER: 2, AUTHORITY: 2, ADDITIONAL: 2

;; QUESTION SECTION:
;www.mogulus.com.               IN      A

;; ANSWER SECTION:
www.mogulus.com.        7200    IN      A       67.202.12.112
www.mogulus.com.        7200    IN      A       72.44.57.45
$ host 67.202.12.112
112.12.202.67.in-addr.arpa domain name pointer ec2-67-202-12-112.z-1.compute-1.amazonaws.com.
$ host 72.44.57.45
45.57.44.72.in-addr.arpa domain name pointer ec2-72-44-57-45.z-1.compute-1.amazonaws.com.

Rather than a single A record with a very low TTL Mogulus uses two A records pointing to two different EC2 nodes and a TTL of 7200 seconds (two hours).

Personally, I consider these low TTL values (especially the 60s one) to be mildly anti-social behavior because it forces additional work on DNS servers throughout the Internet to deal with a local problem. Amazon should consider adding the ability to statically provision IP addresses. This would allow the Internet facing EC2 nodes to have consistent addresses and thereby reduce the failover problems. Like everything else in EC2, this could be charged by usage. I’d be happy to pay a few dollars (5, 10, x?) a month for single IPv4 address within EC2 that I could assign to a node of my choosing.

Pricing

Unless you are reading this close to the date it was written it is probably a good idea to visit Amazon for pricing information instead of relying on the data here.

Instance time

When I first starting investigating EC2 I misinterpreted EC2’s pricing. I thought that instance usage was charged on a CPU time basis. This would effectively mean that an idle server would cost next to nothing. The correct interpretation is that billing is based on how long the instance is running not how much CPU it uses. The current EC2 pricing is:

  • $0.10/hour – Small Instance
  • $0.40/hour – Large Instance
  • $0.80/hour – Extra Large Instance

This makes the constant use of a single small instance cost $70/month. Pretty reasonable especially when you consider that you do not have to buy the hardware.

Data transfer

Using EC2 also incurs data transfer charges.

  • Data transfer into EC2 from the Internet: $0.10/GB.
  • Data transfer out of EC2 to the Internet: $0.18/GB (gets cheaper if you use > 10TB/month).

Data transfer between EC2 nodes and to/from the S3 persistent storage service is free. Note that S3 has its own pricing structure.

Summary

In a lot of ways EC2 is similar to server location services. At its lowest level EC2 gives you a ‘server’ to work with. Given the prices outlined above using EC2 as a colocation replacement may be a good choice depending on your requirements.

What really makes EC2 interesting is its API and dynamic nature. The EC2 API makes it possible for resources such as servers and the hosting environment in general to become a component of your application instead of something which the application is built on. Applications built on EC2 have the ability to automatically add and remove nodes as demands change. Replacing failed nodes can also be automated. Giving applications the ability to respond to their environment is very intriguing idea. Somehow it makes the application seem more alive.