Tag Archives: Bufferbloat

Improving my home Internet performance

For a long time I’ve experimented with shaping my upstream traffic via Linux’s traffic management functionality (tc command) with the goal of improving my Internet connection’s performance. The latest incarnation of this configuration can be found in this script. Anecdotally this configuration greatly improves interactive performance. Use cases such as Skype calls work without a hitch with any other network tasks I want to run at the same time. In this post I provide some simple experimental results and compare against the default configuration.

The goals of the linked tc script are twofold: improve performance under load and stop any single host from monopolizing the available bandwidth. Performance under load is improved by shaping to just below the link bandwidth which stops packets from queuing in the DSL modem and thereby allows the Linux QoS features to manage the traffic. Achieving host fairness is accomplished by hashing the hosts on the network across a set of buckets.  Flow fairness is accomplished via the underlying fq_codel QDisc.

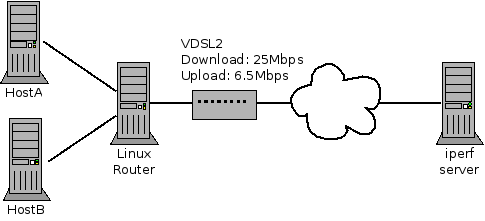
Subset of my home network

Figure 1: Subset of my home network

Figure 1 shows the layout of the network. Note that when I performed these tests I didn’t disconnect all other devices so these aren’t perfect lab style results.

iperf and ICMP ping

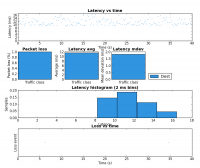
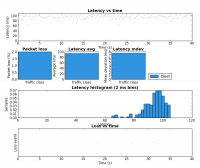
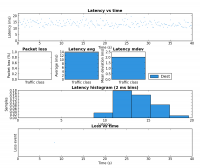
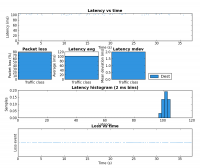
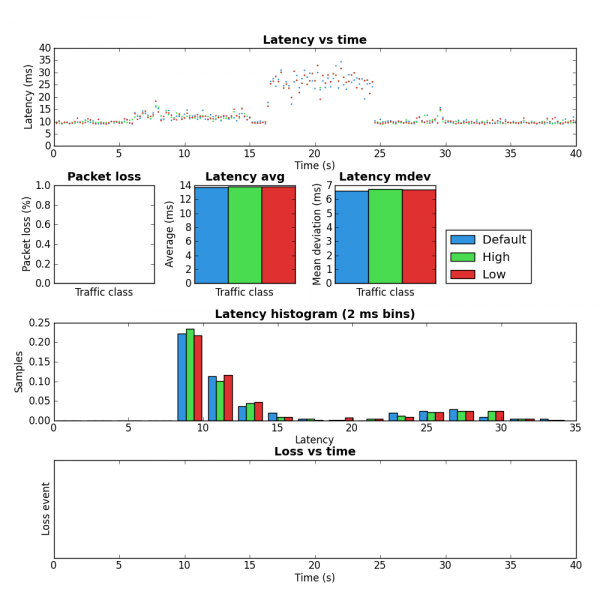
The fist test involves running iperf set to 200kbps and 500 byte packets. This is meant to be somewhat similar to what an interactive application such as a Skype call would produce. The second test used my pingexp utility to chart the ICMP ping results. For both, six different load scenarios were tested (the rows in the table). In both cases the base load was generated from HostA and the test load was generated on HostB.

 Description iperf 200kbps, 500 byte packets (HostB)
ICMP ping results [via pingexp] (HostB)
1 Unloaded 0% loss / 0.229 ms jitter  1
2 Unloaded with tc script 0% loss / 0.197 ms jitter  2
3 Three scp from HostA
0.6% loss / 2.6 ms jitter  3
4 Three scp from HostA with tc script 0% loss / 0.496 ms jitter  4
5 iperf 8Mbps, 1400 byte packets from HostA
[Attempted twice, failed on first attempt] 69% loss / 1.58 ms jitter  5
6 iperf 8Mbps, 1400 byte packets from HostA with tc script 0% loss / 0.804 ms jitter 6

Notice the large decrease in latency between rows 3 and 4. This is the result of shaping to below the link rate which stops the buffer in the DSL modem from filling.

The biggest improvement can be seen the last two rows of the table. Without the tc script there is a large amount of packet loss but with the tc script in place HostB’s traffic is affected very little by HostA’s. Due to the use of fq_codel as the underlying QDisc, it is very likely these results would be very similar if both iperf instances were run on HostA but this was not tested.

scp

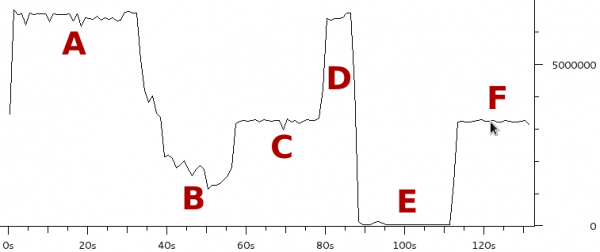
The third experiment duplicated the six load scenarios above but instead used a single scp transfer on HostB as the test load. Figure 1 shows the result as captured and charted by Wireshark. Each of the six scenarios were run for approximately 20 seconds.

Bitrate of scp from HostB during test scenarios

Figure 1: Bitrate of scp from HostB during the six test scenarios

The region marked A corresponds to the two unloaded scenarios (rows 1 and 2 in the table above). As expected there is little difference as both scenarios max the upstream link when there is no contention.

Notice how much the rate drops in region B (row 3 in table) when the three scps are started on HostA. The bitrate is approximately 1/4 of the link rate which is expected since there are four scps running.

Region C (row 4 in the table) has the same four scps but with the tc script in place HostB gets 50% of the link rate and therefore HostA’s three scps share the other 50%. This shows that the tc configuration achieves per host fairness in terms of bandwidth allocation.

Region D should be ignored as it is the result of me taking too long to setup scenario 5.

Region E (row 5) is very interesting. This is where the 8Mbps iperf UDP flood starts. Notice that the scp from HostB is completely drowned out and is effectively unable to transfer any data. This is an extreme example of the kind of dramatic performance drop under load which many have come to expect from busy Internet links. As we’ll see in region F, this is not a fundamental problem with the Internet, it is the result not properly managing the buffers.

Region F (row 6) consists of the same traffic as region E expect the tc script is now in place. Like region C, HostB is now getting 50% of the available bandwidth even though HostA is trying to transmit at a rate higher than the total link rate. This shows that a bit of active queue management can make an Internet connection usable under high load.

Web Traffic

To get a sense for what difference the tc configuration makes to web performance I ran Google Chrome in benchmarking mode for the same six scenarios. The results are presented in the table below.

  url iterations via spdy doc load mean paint mean total load mean stddev Read KBps Write KBps # DOM
1 http://www.google.ca 25 false 186.7 199.7 490 188 NaN NaN 270
2 http://www.google.ca 25 false 176.2 190 380.7 181.4 NaN NaN 270
3 http://www.google.ca 25 false 834.6 843.6 1506.8 1044.6 NaN NaN 270
4 http://www.google.ca 25 false 178.2 192.4 416.7 226.1 NaN NaN 270
5 http://www.google.ca Failed Failed Failed Failed Failed Failed Failed Failed Failed
6 http://www.google.ca 25 false 175.4 188.3 380.5 176.4 NaN NaN 270

I have marked the entries in row 5 as failed because after 120 seconds a single page load had not yet completed.

Like above, the interesting rows to contrast are three and four as well as five and six. In both cases the tc configuration greatly reduced the time required to load www.google.ca.

Summary

This post presented results which showed that the performance and predictability of a DSL residential Internet connection can be greatly improved with some basic traffic management running on a Linux router. If you don’t have a Linux router you may still want to take a look at the configuration of your home router. If it supports bandwidth shaping, try setting it to just below your link rate. The results won’t be as good as presented here but it should make a noticeable improvement.
Per packet overhead on VDSL2 – part 3

Previous instalments:

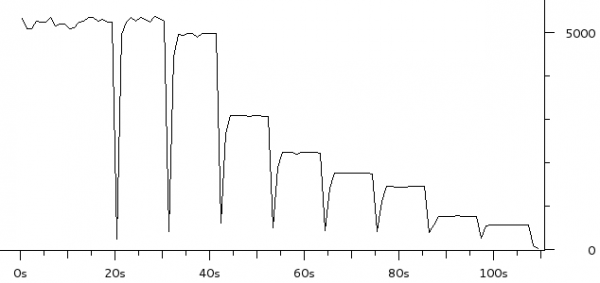
For tonight’s edition I have increased the number of small packet sizes in the experiment and dropped the larger sizes. For each of the following data sizes (iperf -l) there are five seconds of traffic: 0, 10, 20, 30, 40, 50, 60, 70, 80, 90, 100, 110, 120, 130, 140, 150, 160, 170, 180, 190, 200, 210, 220, 230, 240, 250, 260, 270, 280, 290 and 300 bytes.

Packets per second observed at the destination

For data sizes of up to 90 bytes the packet per second value is pretty much constant. Alex Burr offered a theory on the Bufferbloat list that I may be hitting a packet rate limitation. If I understand properly, the above chart seems to support this.

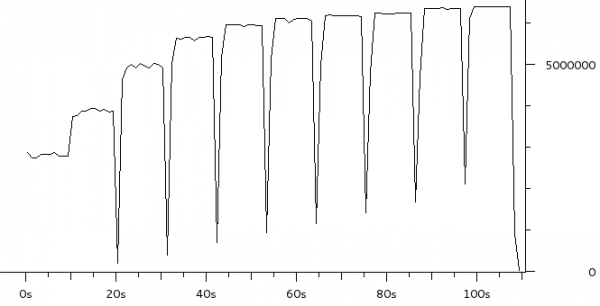
Bitrate observed at the destination

From the bitrate perspective, the curve flattens around 90 bytes of data as well.

Per packet overhead on VDSL2 – part 2

A few days ago I wrote about some interesting latency results I observed on my home Internet connection with small packets. This post adds a bit more data.

In this experiment I disabled all upstream traffic shaping and then used iperf to blast UDP packets of various sizes to a destination host I control. The transmitted rate was 10Mbps and the upstream link rate is ~6.5Mbps. On the destination I captured the packets with tcpdump and generated the charts below with Wireshark.

The charts show ten sub-experiments – 10 seconds of traffic for each data size (iperf -l): 25, 50, 75, 100, 200, 300, 400, 500, 1000, 1400 bytes. T0 is when the first packet is received.

Packets per second observed at the destination

The first chart shows the packets per second received at the destination. Not surprisingly, the packet rate is much higher with small packets.

Bitrate observed at the destination

The second chart shows the bitrate observed at the destination. Notice that for small packets the effective bitrate is much lower. This seems to support the theory that this link has a lot of per-packet overhead.

Per packet overhead on VDSL2

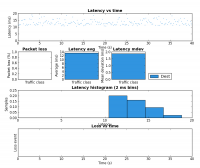
My home router (Linux box) is configured to shape upstream traffic to just below the link rate to avoid Bufferbloat – this greatly improves interactive performance under load. Recently I’ve experimented with various packet sizes. The charts below show the effect of small packets.

Effect of per-packet overhead on VDSL2?

  1. Between 0-6 seconds the link is idle.
  2. From 6-14 seconds the upstream link is flooded with 1,400 byte packets (10Mb/sec of traffic trying to get through a 6.2Mb link)
  3. At 17 seconds the upstream link is flooded with 64 byte packets (10Mb/sec as well)

Notice how much higher the latency and jitter are with small packets.

Confusingly, these results were gathered with the bandwidth shaper configured for 53 bytes of overhead [1] which is my current understanding of the per-packet overhead on VDSL2 [53 is a coincidence with the ATM cell size].

Per-packet overhead for VDSL2 (without ATM) and PPPoE:

  • 5 Bytes for PTM
  • 40 bytes for 802.3
  • 8 bytes for PPPoE

Either the above overhead numbers or wrong or there is something else going on.

[1] – overhead argument to tc.


Network latency experiments

Recently a series of blog posts by Jim Gettys has started a lot of interesting discussions and research around the Bufferbloat problem. Bufferbloat is the term Gettys’ coined to describe huge packet buffers in network equipment which have been added through ignorance or a misguided attempt to avoid packet loss. These oversized buffers have the affect of greatly increasing latency when the network is under load.

If you’ve ever tried to use an application which requires low latency, such as VoIP or a SSH terminal at the same time as a large data transfer and experienced high latency then you have likely experienced Bufferbloat. What I find really interesting about this problem is that it is so ubiquitous that most people think this is how it is supposed to work.

I’m not going to repeat all of the details of the Bufferbloat problem here (see bufferbloat.net) but note that Bufferbloat occurs at may different places in the network. It is present within network interface device drivers, software interfaces, modems and routers.

For many the first instinct of how to respond to Bufferbloat is add traffic classification, which is often referred to simply as QoS. While this can also be a useful tool on top of the real solution it does not solve the problem. The only way to solve Bufferbloat is a combination of properly sizing the buffers and Active Queue Management (AQM).

As it turns out I’ve been mitigating the effects of Bufferbloat (to great benefit) on my home Internet connection for some time. This has been accomplished through traffic shaping, traffic classification and using sane queue lengths with Linux’s queuing disciplines. I confess to not understanding, until the recent activity, that interface queues and driver internal queues are also a big part of the latency problem. I’ve since updated my network configuration to take this into account.

In the remainder of this post I will show the effects that a few different queuing configurations have on network latency. The results will be presented using a little utility I developed called Ping-exp. The name is a bit lame but Ping-exp has made it a lot easier for me to compare the results of different network traffic configurations.

Continue reading